Using YOLOv8 to identifying sheeps
In ths post I'll use google colab to train yolov8 to identifying sheeps in simple dataset. The main here is how to train yolov8 with few code lines. Let's goo guys!
What is YOLOv8?
Let's start at the beginning, the YOLO (You Only Look Once) model series has gained popularity in the computer vision field due to its impressive accuracy and small model size. This has made YOLO accessible to a broad range of developers, as it can be trained on a single GPU. This has allowed machine learning experts to utilize it on edge hardware or in the cloud at a low cost.
Since its debut in 2015 by Joseph Redmond, YOLO has been supported by the computer vision community. Initially, YOLO was written in C code and maintained in a custom deep learning framework created by Redmond, named Darknet. The early versions (1-4) were developed using this framework.
Glenn Jocher, the author of YOLOv8 at Ultralytics, initially created a PyTorch-based shadow repository of YOLOv3, a deep learning framework from Facebook. As the training improved in the shadow repository, Ultralytics eventually released its own model, YOLOv5, which quickly became the world's state-of-the-art (SOTA) repository due to its flexible Pythonic structure. This structure allowed the community to develop new modeling improvements and easily share them across repositories that use similar PyTorch methods.
In addition to the strong fundamentals of the YOLOv5 model, the maintainers have shown a commitment to supporting a healthy software ecosystem around the model by actively addressing issues and pushing the capabilities of the repository as demanded by the community.
Over the past two years, several models have been created based on the YOLOv5 PyTorch repository, including Scaled-YOLOv4, YOLOR, and YOLOv7. Other models emerged globally through their own PyTorch-based implementations, such as YOLOX and YOLOv6. Each of these YOLO models has brought new SOTA techniques that continue to improve the accuracy and efficiency of the model.
Some news about YOLOv8 are:
Faster and More Accurate.
User-friendly API (Command Line + Python).
Supports
Object Detection,
Instance Segmentation,
Image Classification.
Extensible to all previous versions.
New Backbone network.
New Anchor-Free head.
New Loss Function.
And YOLOv8 can run on CPUs & GPUs because is highly efficient and flexible supporting numerous export formats.
There are five models available for detection, segmentation, and classification. This models are:
YOLOv8n, YOLOv8s, YOLOv8m, YOLOv8l, YOLOv8x
Among the YOLOv8 models, the YOLOv8 Nano is both the smallest and the fastest, whereas the YOLOv8 Extra Large (YOLOv8x) is the slowest but the most accurate.
YOLOv8 Architecture:
As of now, there is no published paper on YOLOv8, thus direct insight into the research methodology and ablation studies conducted during its creation is unavailable. Nonetheless, we have examined the repository and available information about the model to begin documenting its new features. To explore the code yourself, visit the YOLOv8 repository.
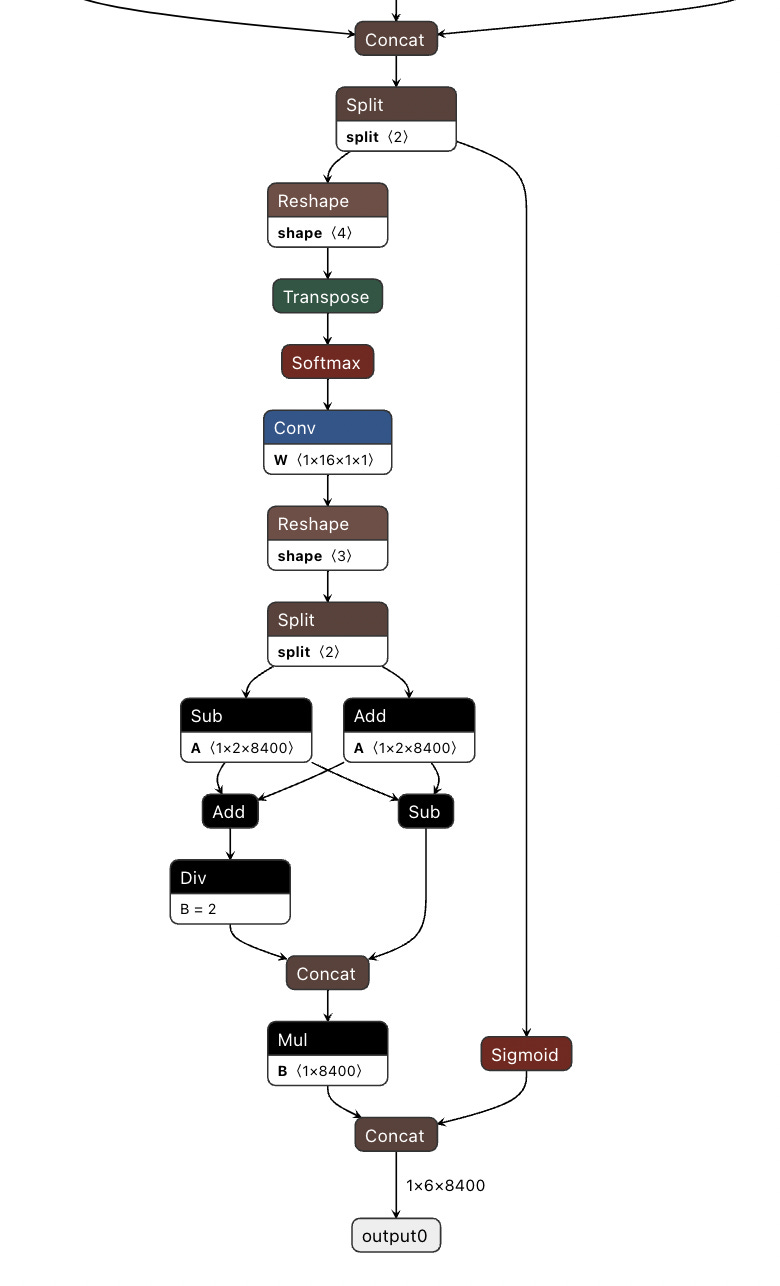
Now I’ll try present a brief summary of impactful modeling updates and then delve into the model's evaluation, which speaks for itself. A GitHub user, RangeKing, has created a detailed visualization of the network's architecture, which is displayed below
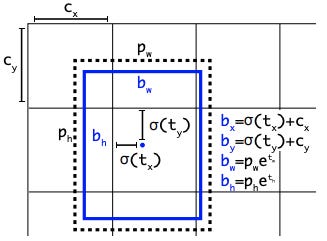
One interesting thing about YOLOv8 is its anchor-free detection. The only other YOLO version that uses this is the first version. YOLOv8 is a model that doesn't rely on anchors. Instead, it predicts the center of an object directly, without the need for an offset from a known anchor box.

Earlier YOLO models had a challenging aspect with anchor boxes because they could represent the distribution of the target benchmark's boxes, but not necessarily the distribution of a custom dataset. The detection method that is anchor-free lowers the number of box predictions, thus accelerating the Non-Maximum Suppression (NMS), a complex post-processing step that filters through potential detections following inference.

Other thing are new convolutions in YOLOv8, the first 6x6 convolution in the stem is replaced by a 3x3, the primary building block is altered, and C3 is replaced by C2f. The module can be seen in the image below, where "f" represents the number of features, "e" indicates the expansion rate, and CBS refers to a block consisting of a Convolution, Batch Normalization, and SiLU activation function.
In C2f, all the outputs from the Bottleneck (two 3x3 convolutions with residual connections) are merged. On the other hand, in C3, only the output of the last Bottleneck is utilized.
Although the Bottleneck in YOLOv8 is identical to that in YOLOv5, the kernel size of the first convolution has been altered from 1x1 to 3x3. This indicates that YOLOv8 is returning to the ResNet block definition from 2015.
In the neck, features are concatenated without enforcing uniform channel dimensions, resulting in a reduction in parameter count and tensor size.
Let’s Code
To make our application, we will use Google Colab. The first thing to do is to open this platform. We will need a dataset. To do so, we can download the dataset using this link https://www.kaggle.com/datasets/felipemeganha/sheep-yolov8, which contains a small dataset with pictures of sheep and their respective YOLO label marks.
Note that we have a folder called "dataset", which contains two other folders, "train" and "val". This folder hierarchy is necessary to train YOLOv8.
I downloaded this dataset and created a folder called "yolov8" in my Google Drive, and then uploaded this dataset to that folder.
Now create a google colab and check nvidia GPU, mount your drive and copy our dataset to the root.
Finished the job, install the ultralytics lib and execute this code:
!pip install ultralyticsfrom ultralytics import YOLO
Please note that I will need to set the preferred encoding to UTF-8, as I encountered a bug during my tests.

Next, we need to create a .yaml file, which will define the folder hierarchy and contain information about our class names. Here's what you need to do:
from ultralytics import YOLO
import os
import cv2
from google.colab.patches import cv2_imshow
import matplotlib.pyplot as plt
import locale


def getpreferredencoding(do_setlocale = True):
    return "UTF-8"

locale.getpreferredencoding = getpreferredencoding
Please note that I will need to set the preferred encoding to UTF-8, as I encountered a bug during my tests.
Next, we need to create a .yaml file, which will define the folder hierarchy and contain information about our class names. Here's what you need to do:
!touch configs_modelo.yaml

%%writefile configs_modelo.yaml
path: '/content/dataset'
train: 'train/'
val: 'val/'

nc: 1
names: ["sheep"]
Now we’ll create our model and info the the .yaml path.
diretorio_raiz = '/content/'
arquivo_config  = os.path.join(diretorio_raiz, 'configs_modelo.yaml')
model = YOLO('yolov8s.yaml')Note that we use the yolov8 model small and this are some informations.
Now the main of our job, train the YOLOv8.
resultados = model.train(data=arquivo_config, epochs=50, imgsz=640, name='yolov8s_modelo')This code includes information about the number of epochs, image size, and the name of our training dataset. During the training process, we monitor mAP50, and if it decreases, it's a good sign. Once the training is complete, the model will be saved in a folder named "runs/detect/yolov8s_modelo", as shown in the image below.
Now, we can make some predictions with the following lines of code. First, we create a path to our model. Then, we use a command system to predict images and save them. Finally, we display the predicted image.
dir_resultados = '/content/runs/detect/yolov8s_modelo'

!yolo task=detect mode=predict model={dir_resultados}/weights/best.pt source='/content/dataset/teste.png' save=true

dir_predicts = 'runs/detect/predict3/'
image_path = [os.path.join(dir_predicts, f) for f in os.listdir(dir_predicts)]
for path_img in image_path:
    img = cv2.imread(path_img)
    cv2_imshow(img)
And this is some images prediction with YOLOv8.
You can save YOLOv8 model in specific way, like onnx model.
model_finish = YOLO('/content/runs/detect/train/weights/best.pt')
model_finish.export(format='onnx')
This is it folkers. See you in next post.
References:
https://blog.roboflow.com/whats-new-in-yolov8/
https://ultralytics.com/yolov8
https://learnopencv.com/ultralytics-yolov8/


